I promise a separate tutorial on the eyes and lips and here it is! I'm sure from the popularity of my
BB cream post that you all know I'm using only my BB cream and NYX's Stay Matte powder for my foundation.
Let's begin, shall we?
As I said in my previous
Gatsby post, my look was inspired by ads of the 1920s and by French actress Polaire. The common practice for women was to smudge kohl across the eyes and have doll-like lips. I showed you my reshaped lips and now will show you my technique. Forewarning: in using black eyeshadow, I applied my foundation after to avoid having black flecks. You can also apply loose powder and sweep it away along with any fallout.
Face:
- SKIN79 Super+ Hot Pink BB Cream
- NYX HD Studio Photogenic "Stay Matte But Not Flat" Powder Foundation - SM01 Ivory
Eyes:
- Urban Decay 24/7 Eyeliner - Zero
- tokidoki Adios Cromatico Eyeshadow Palette - Adios (discontinued; any matte black works)
- Urban Decay Eyeshadow - Black Market (satin; black), Desperation (satin; gray), Unhinged (metallic teal-turquoise)*
- Urban Decay Eyeshadow Primer Potion - Original
Lips:
- L'Oreal Rouge Pulp Lip Liner - The Sultry Plums (discontinued; pick your lips!)
- Covergirl Lip Perfection Lipstick - 360 Euphoria
- LUSH Lip Scrub - Sugar Lips (you can make your own lip scrub easily, I had already had this though)
Tools:
- real Techniques Powder Brush
- Smashbox Travel Smudger Brush
- Eyeshadow brush
- Concealer brush
For the eyes:
 |
| (Mostly) Clean brows! |
1. Prime your eyes with your favorite
product. You will need black eyeliner and a good brush for smudging. I
kept my liner in the outer corner personally, just sort of "scribbling"
while being gentle (because I have used harder eye pencils!). I only smudged
slightly into the crease. When
you have a good amount of liner, you can start smudging. Since I was
using Urban Decay's 24/7 liner pencil, I had to color then smudge
because this liner "sets."
 |
| Eyeliner - pre-smudging |
 |
| Post smudging |
 |
| Applied more liner, smudged again. |
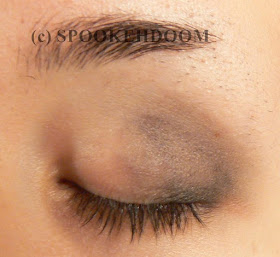
2. Following the eyeliner,
to keep it in place and darken it up, grab your favorite black eyeshadow.
I chose matte black and pushed it from my outer corner till it was
almost in the center. I used my smudger brush to apply the black and
blend. The black will also serve as a nice means to blend whatever your
second color is into the eyeliner and darken your color if you choose.
You can really make this a more day-time appropriate look by
substituting black shadow for possibly a gray! And of course, you could
do this with neutrals; brown eyeliner with brown shadow on top.
3. For this look, you really
want to keep it on the eye's outer corner and keep it rounded. To
achieve this, I cleaned up the edge with makeup remover and a cotton
bud. I'm also a bit messy when I blend, so it was going away from my eye
a little.
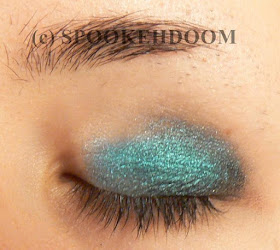
4. Pick your second shade; popular colors
were turquoise and green but as stated earlier, you can do neutrals or
whatever color you love. I personally chose to use turquoise, picking
Unhinged
by Urban Decay which was what I had on hand. I used a flat eyeshadow
brush to apply the turquoise in the center without bringing it to the
inner corner. If your color is lighter, you can probably bring it from
the center to the inner corner. I followed this by blending it into the
black, using gray
Armor and satiny
Black Market by Urban
Decay to darken, make the turquoise more subtle and to easily blend the
color into the black. With a brighter color on your eyes, making it
subtle can work in your favor though it's your choice.
 |
| Unhinged over Adios. Reminds me of a beetle! |
 |
| Black Market with Desperation blended over and into Unhinged. |
5. You can apply liquid liner or skip it entirely. I just did a thin line at my lashes that stopped at the outer corner.
 |
| I did a bit more blending, layering more Unhinged over Black Market and Desperation. |
6. Follow your normal routine for your lashes and brows. I applied my beloved FAIRYDROPS
Scandal Queen
mascara and filled in my brows with a chocolate brown eyeshadow. As you
can plainly see, I have really little brows. I call them "elf brows,"
and am working for a Spock brow look (without the serious black brow
look!).
For the lips:
 |
Bare lips
|
1. If you need to, scrub your lips with a tooth
brush or a sugar lip scrub. I used both! Apply your favorite lip balm
while you do other things.
 |
| Applying lip scrub |
 |
| Lips cleaned up after scrub |
 |
| Lip balm |
2. Pick your lip liner! If
you need to, blot your lips to remove some of the lip balm. You have two
options for covering your natural lip line: drawing the new line then
applying foundation/concealer to cover any area outside of the new line
OR cover your lips entirely in your foundation/concealer
lightly and
powder followed by your new line. Now with your chosen lip liner, start
with defining your Cupid's Bow. Women overdrew the Cupid's Bow but I
chose not to, instead carefully drawing my new line within my natural
lip line. Personally, I concealed my lip line
after drawing them.
 |
| Blotting away some balm |
 |
| Starting with the top lip, |
3. If you're happy with your line, fill in
the area and make sure your natural lip line is covered! When that's
done, you can move to the bottom lip. Women made overdrew their bottom
lip as well while giving it a very specific shape. I made mine smaller
by moving my line inward and kept the very bottom line in with my
natural lip line. Once again, fill in your new lip line and cover up
your natural line. I had to blot because the L'Oreal pencil I used had a
lot of slip and was very creamy. It was almost like a lipstick in the
form of a skinny pencil!
 |
| Top lip filled |
 |
| Drawing the bottom lip |
 |
| Filled |
 |
| And lip line concealed! |
4. Pick your lip color! This
can be anything your heart desires, so long as you love your color. I
used Covergirl Lip Perfection in Euphoria, which darks in the tube but
comes off as a wearable pinky-berry color. My lipstick didn't match my
liner, though the liner actually darkened the color nicely. You can go
straight from the bullet or use a lip brush (if you have one). Be
careful with your application if you go from the lipstick bullet
directly. I didn't bother blotting this time as it was a very light
layer of lipstick.
 |
| Liner blotted, concealer powder. |
 |
| Lipstick applied |
5. Powder over any
foundation/concealer and periodically check your lips. Be careful not to
rub your lips together or you'll ruin your lip look!
Wear your look proudly. A flapper look is the only time your lips and eyes won't be in competition. In
The Great Gatsby,
Daisy Buchanan had neutral eye makeup and a nude-pink lip. Her friend,
Jordan Baker, wore light orange lips and neutral brown makeup. Quite a
nice look but I definitely wouldn't wear opaque orange lipstick (it's just a
personal preference!). I do, admittedly, have an orange liquid lip tint that actually is quite pretty on!
PS:
I know this isn't a perfect recreation of my look, but well... How can you recreate a look perfectly every time? I also have some more looks up my sleeve (and that so frustrating Apocalypse look from Valentine's Day...). Keep reading ~
*To my knowledge, these Urban Decay shades are an exclusive to The Vice palette, which I bought shortly after Christmas 2012.
SPOOKEHDOOM


No comments:
Post a Comment
Leave a comment and I'll get back to you as soon as I can ~